Create a Service Contract
OBJECTIVE
In every Service Company, there is a need to define and understand the difference between Customers, Service Sites, and Service Contracts.
Customers refer to Accounts Receivable records. The Customer is the entity that gets billed for the work, and the Customer is the entity that PAYS for the work.
Service Sites are Physical Locations where the work is performed. There may be many Service Sites per Customer, or a single Service Site per customer. Invoices can be produced and approved for each Site.
Service Contracts represent the Agreement between the Customer and the Supplier. Contracts can be used to define the Service time frame, the services to be performed, the Customer equipment to be serviced, the agreed price for parts and labor, and many other details.
Service Contracts can be used to manage Warranty Periods, Customer Pricing, or simply to track the CALLS that are being handled by the service department for different types of services offered.
PREREQUISITE
- The Service Management module must be installed.
- Customer Management
Summary
This document will explain many of the options for setup and management of Service Contracts using maestro*.
Click under a link to have access directly to the topic:
- Identify the Customer
- Setup the Customer
- Setup the Contract
- Master Contract Inquiry
- Service Invoicing Options
Steps
Identify the Customer
In maestro*, Accounts Receivable records are set up to match the needs of our Customer. If this is a Corporate Customer, with many Service Sites, we need to determine how the Customer wants us to manage their Accounts Receivable.
For example, if the customer wants us to manage their Accounts Receivable for the Entire Corporation in a single account we can accommodate that need.
However, if they wish us to manage Accounts Receivable in separate accounts for each Site, we can also accommodate that need. This question is independent of how we will create the Invoice, and only relates to how we establish our AR Customer List.
If that Client has a single negotiated contract, and that Client has many service sites covered under the contract, then that client should be set up as ONE CUSTOMER in maestro*. This configuration results in just ONE AR record for this Customer, with each Site set up as a separate Address linked to that Customer Record.
Each Site will still have separate Contracts, Calls and Invoices, and each invoice can be transmitted to the Customer or the Site for approval. The main point is that in Accounts Receivable, there is just one Customer record collecting all of the invoices.
If that Client has multiple contracts, where each Site is responsible for approval and payment of their own invoices, then in Accounts Receivable, we should create one Customer for each Site.
Of course, in any company, there will be Customers and unlimited combinations of each of the above scenarios.
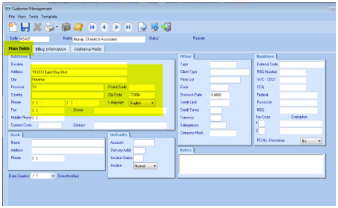
Setup the Customer
In maestro* Customer management option, we will create the Customer Record.
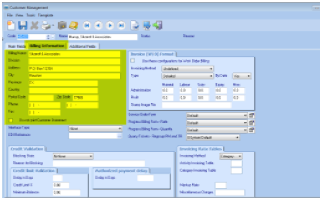
This will include the Customer Address as well as a Billing Address. The Billing Information address need only be used if the invoices are sent to an address different from the Customer Address on the Main Fields tab screen.
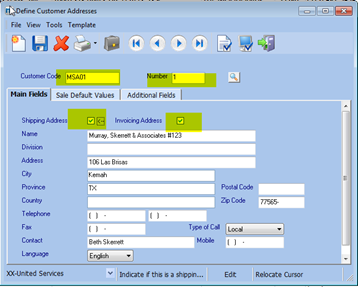
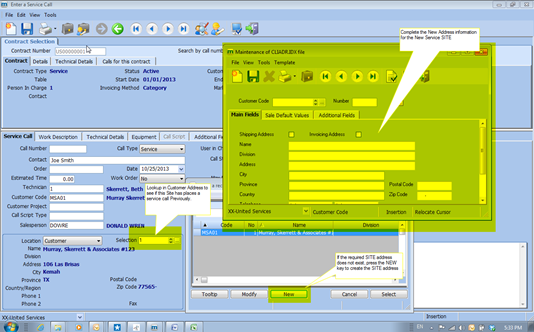
In addition to the two Customer addresses above, we can also create unlimited Site addresses for each Customer in the Define Customer Addresses option. Each Site address can specify if this is a Shipping address (Physical location) or Invoicing address. We must activate the Shipping Address flag to indicate this address is available when creating Service Contracts.
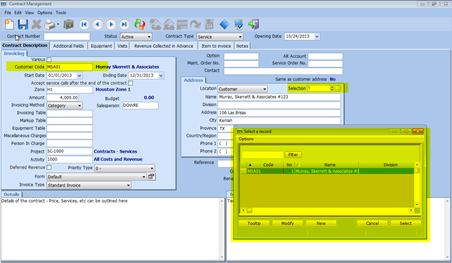
Setup the Contract
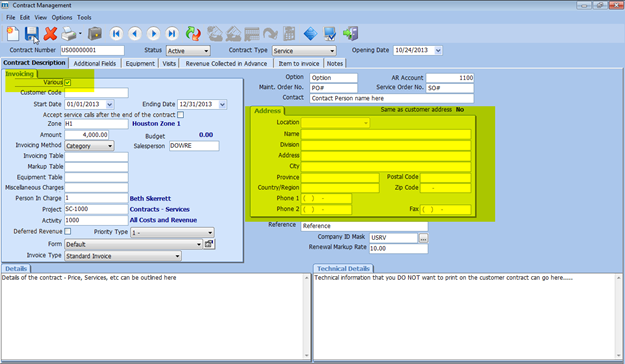
The Service Contract is simply an agreement between you and your Customer for the services you will perform.
Service Contracts can be created for individual Customers, or for Groups of Customers, where more than one customer is billed against a single contract.
For Each Contract, if we specify the Customer Code as part of the Contract, we can also specify the service address, or Site where the service is to be performed.
Contract – Option 1: One Contract By Site
In Option 1, each Site will have its own contract, and we will track, report and analyze all of the service calls we receive from that Site.
The contract can list Site Specific information about the Equipment being serviced at this site, as well as the scheduled maintenance calls to be performed an each Site.
|
This is often necessary when the type of service being provided is related to specific Equipment units requiring the technician to arrive at the Site on a scheduled basis, with the correct parts and materials to service that equipment. Maintenance Contracts for HVAC are often defined this way. |
The invoice generated from service Calls on this contract type can be sent to the Customer Address or the Site Address, depending on the Invoice Form design. In any case, the Site Address will be show on the invoice.
Contract – Option 2: One Contract For All Sites
In Option 2, there will be just one Contract for all Sites. This setup is preferred for clients such as property management companies that agree to a single contract covering hundreds of sites, but the sites are not PRE-DEFINED at the time the contract is created.
|
This type of Contract is popular in some trade services, like electrical and plumbing, where the service being provide is more of a “General” nature, is provided “On Demand”, and does not need to be scheduled in advance or tracked for specific pieces of equipment. |
We will sill track, report and analyze all of the service calls by site. In this case, we create one contract that covers all sites, and allow the user Create the appropriate Site address when entering the Service Call.
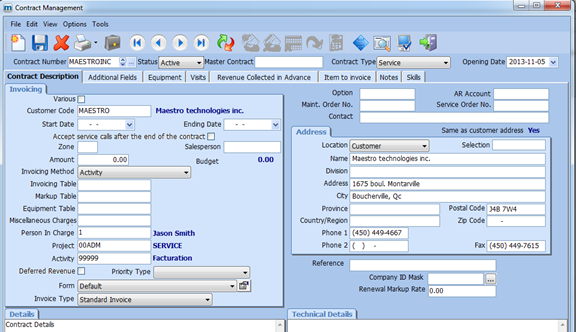
Contract – Option 3: One Contract For Non-Contract Customers
For “Non-Contract Customers”, we can create generic Group Contracts to track the types of Calls we are receiving.
For example, we might have a contract called “HVAC ON DEMAND”. Each time we receive a call where there is no NEGOTIATED CONTRACT for the customer, we will tag the call to the HVAC ON DEMAND Contract.
This allows us to track these calls easily and manage the profitability of this kind of On Demand service.
In addition, it provides the sales team with a great source of prospects for potential sales of Negotiated Contracts.
|
These Contracts are created with the “VARIOUS” flag activated, and no Site address completed. |
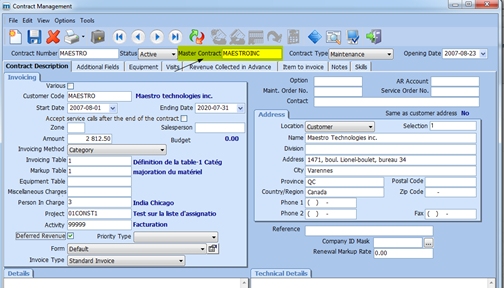
Contract – Option 4: Create a Master Contract
A master contract can be created to view all calls entered in multiple sub-contracts belonging to the same group.
|
No transactions (Return from a Service Call, Distribute Hours, Preparation or Invoicing) can be conducted on the master contract. The master contract will only be used when viewing contracts for grouping purposes. |
For example, in the business industry, it would be possible to create a contract representing the head office of a company. For each branch, you could create a sub-contract to retrieve calls made at each branch.
|
Only the information in the Contract Description tab must be completed. The work address is not necessary for the master project. When the master contract is created, the Master Contract field must be empty. |
Below are the steps for linking a sub-contract to a master contract:
For an existing contract:
- Select a contract on the screen and complete the Master Contract field.
For a new contract:
- Enter the contract number of the sub-contract and then enter the number of the master contract in the appropriate field.
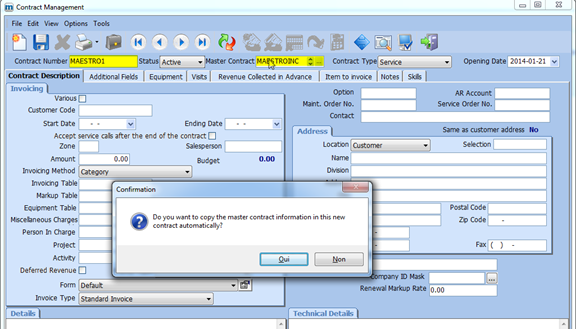
- When you enter the master contract, a message is displayed on the screen. By answering Yes, the information from the Contract Description tab of the master contract is copied to the sub-contract, excluding the contract amount.
When the sub-contracts are linked to a master contract, it will be possible to view all calls on sub-contracts by consulting the master contract from Service Contract Inquiry.
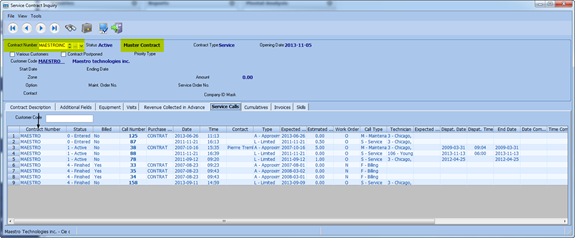
Consulting a Master Contract
The master contract can only be consulted using the Service Contract Inquiry option.
When a master contract is selected, the information in the Service Calls and Cumulative Amounts tabs are updated to show all the data related to sub-contracts.
Service Invoicing Options
When Invoicing the Contract or the Call, the Customers may have varied requirements. Some customers will require that we send individual invoices to each Site, but still report a summary of these invoices to the head office.
Maestro* allows this Default to be defined in each Contract using the Invoice Type field, however this can be altered at the time of invoicing. There are 3 choices are available:
- Standard invoice – The invoice will be sent to the Site or Customer Address, and updated as a single transaction in the CUSTOMER AR.
- Combine Posted Invoices – The invoice will be sent to the Site or Customer Address, and updated as separate transactions in the CUSTOMER AR. Once posted, a “Consolidated” invoice/Statement will be sent to the Customer address showing a list of all the invoices to be included in this summary.
This allows the Customer to receive a Statement of selected invoices, pay one amount that covers a list of invoices, but retains each invoice as a separate item in our Accounts Receivable. - Consolidate Invoices before Posting – The invoice will be created from multiple service calls, and one Summarized invoice will be sent to the CUSTOMER AR. This allows us to combine Calls from the same customer or contracts onto a single invoice, and have just a single amount in the AR for these multiple calls.

Regardless of the Invoice Type chosen, the steps to prepare an invoice remain the same:
- Close the Call in the Dispatch to release it to Billing;
- Complete the Return from a Service Call and Transfer the Return (Can be done multiple times);
- Complete the Preparation of the Invoice;
- Complete the Invoicing. (Final chance to choose one of the 3 invoicing options above);
- Complete the Combined Invoicing option (if the Invoice Type defined in the contract is Combine Posted Invoices or Consolidate Invoices before Posting).
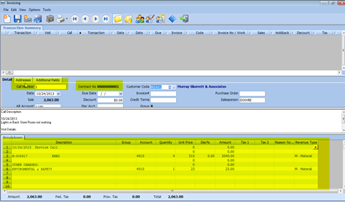
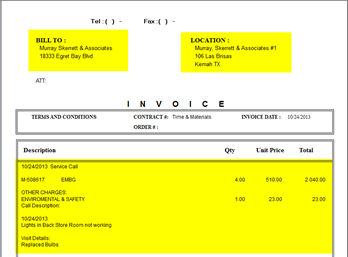
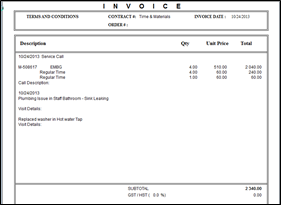
Service Invoicing Option – Standard Invoice
The Standard Invoice option is considered the most common invoicing method, where the Call produces a single Invoice, and that Invoice Posted to Accounts Receivable.
Invoicing Screen:
Sample Invoice:
|
Invoice Type can be defined for each CONTRACT. |
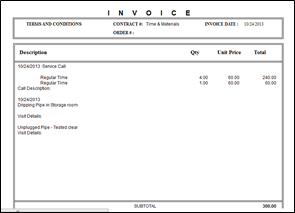
Service Invoicing Option – Combine Posted Invoices
The Combine Posted Invoices option is used to provide the customer with a Summary of a group of invoices processed in a specific time period. The Processing of the call is the same as for Standard Invoice, and the posting of each invoice is made separately to the CUSTOMER AR account. This option simply allows the invoices to be re-capturedto a Summary Invoice which can be sent to the Client.
This Type of invoicing is often used when Customers require the approval of each invoice, however they want a summarized list of the invoices to be submitted each month.
Invoices Processed:
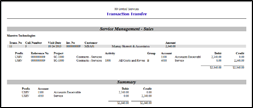
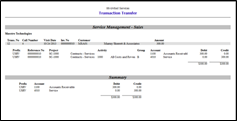
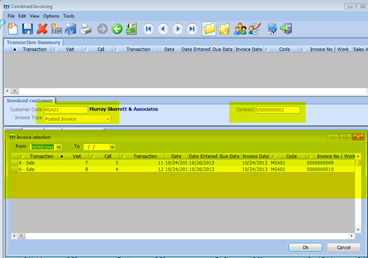
The user must proceed to the Combined Invoicing option, and from here select the Posted Invoice onto a single Statement Invoice.
|
In this case, the Combined Invoice is a PRINT function ONLY, no posting is done. |
Service Invoicing Option – Consolidate Invoices Before Posting
The Consolidate Invoice before Posting option is used to provide the Customer with a single invoice for multiple calls. The Processing of the call is the same as for Standard Invoice, however when the invoice is Transferred, there is no Accounting Posting performed.
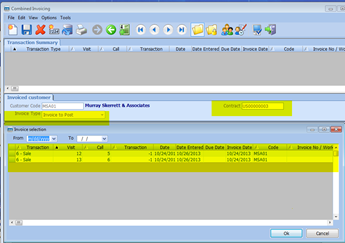
The user must proceed to the Combined Invoicing Option, and from here select the Invoices to be Consolidated onto a Single Invoice.
This Invoice will then be Printed and Transferred, at which time the System will post a Single invoice to the CUSTOMER AR account.
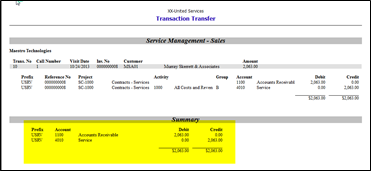
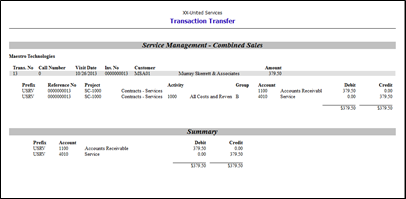
Invoices Processed:

Transaction Posted:
|
One invoice is created from the two calls and the accounting is done when that invoice is transferred. |
See also
- Define Customer Addresses
- Contract Management
- Service Contract Inquiry
- Invoicing
- Combined Invoicing
